Battery Switch on Travel Trailer Function: Understanding your travel trailer’s battery switch is key to enjoying worry-free adventures. This guide dives into the different types of switches, how to use them safely, and what to do when things go wrong. We’ll cover everything from basic operation to troubleshooting and maintenance, ensuring you’re prepared for any situation on the road.
Whether you’re a seasoned RVer or a newbie, knowing how to manage your trailer’s power is essential. This guide will equip you with the knowledge to confidently switch between battery sources, prevent accidental discharges, and resolve common problems. We’ll break down the complexities of your trailer’s electrical system into simple, easy-to-understand steps.
Battery Switch Types in Travel Trailers
Understanding your travel trailer’s battery switch is crucial for managing your power sources and preventing accidental drain. This section will detail the common types of switches, their functionalities, and their respective advantages and disadvantages.
Battery Switch Types
Travel trailers typically utilize two main types of battery switches: the 1-2-Both switch and the 1-2-Off switch. These switches control the flow of power from your trailer batteries (usually two, one for house functions and one for starting the tow vehicle) to the trailer’s electrical system.
1-2-Both Battery Switch Function, Battery switch on travel trailer function
A 1-2-Both switch offers three positions:
- 1: Connects only the first battery (typically the house battery) to the trailer’s electrical system. This allows you to use the house battery while keeping the starting battery separate and fully charged.
- 2: Connects only the second battery (typically the starting battery) to the trailer’s electrical system. This is less common to use but useful in emergency situations or for running a separate system off the starting battery.
- Both: Connects both batteries in parallel, providing maximum power for running high-demand appliances or charging other devices. This position should be used cautiously to avoid over-draining your batteries.
1-2-Off Battery Switch Function
The 1-2-Off switch is similar but includes an “Off” position:
- 1: Connects only the first battery to the trailer’s electrical system.
- 2: Connects only the second battery to the trailer’s electrical system.
- Off: Completely disconnects both batteries from the trailer’s electrical system. This is essential for preventing battery drain when the trailer is stored for extended periods.
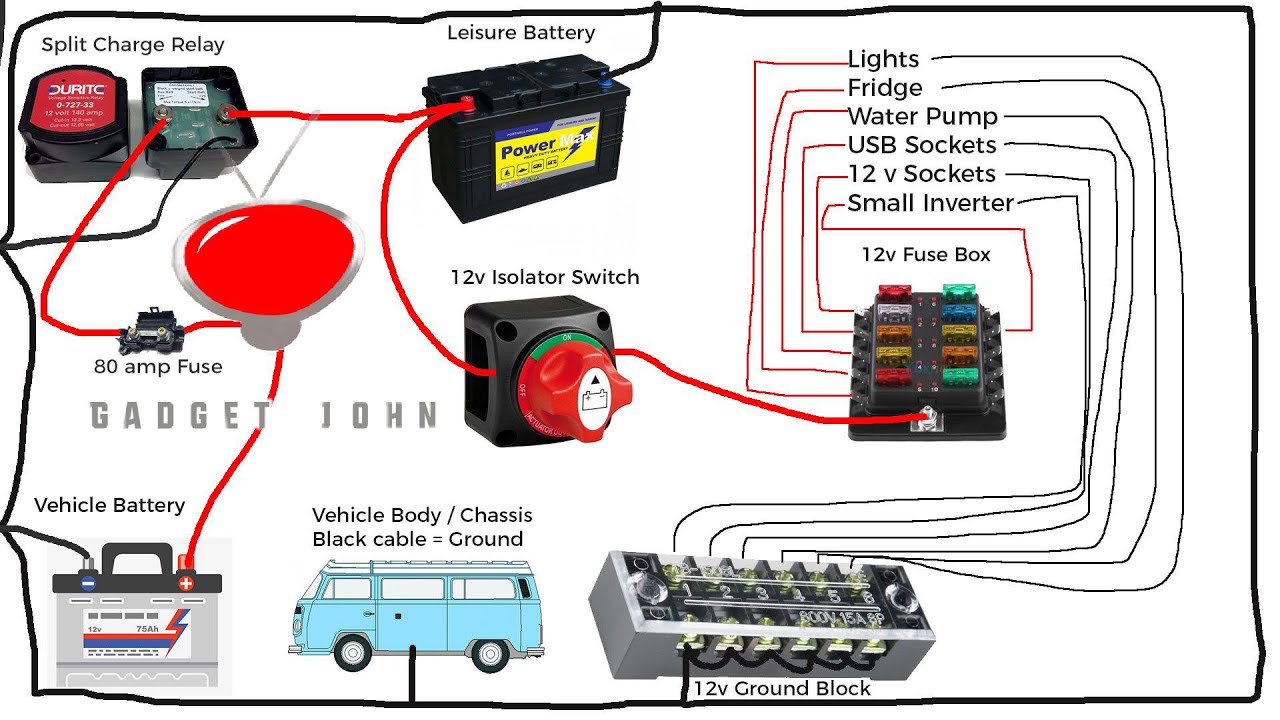
Wiring Diagrams
While specific wiring may vary, here’s a simplified representation of typical setups:
1-2-Both Switch Wiring Diagram
Imagine a diagram showing two batteries (Battery 1 and Battery 2) connected to a three-position switch (1, 2, Both). From the switch, a single wire runs to the positive (+) terminal of the trailer’s electrical system. Negative (-) terminals of both batteries are connected directly to the trailer’s chassis ground. In the “1” position, only Battery 1 is connected to the switch output.
In the “2” position, only Battery 2 is connected. In the “Both” position, both batteries are connected in parallel to the switch output.
1-2-Off Switch Wiring Diagram
Similar to the above, but the “Off” position interrupts the connection between the batteries and the switch output completely, isolating the batteries from the trailer’s electrical system.
Comparison of Battery Switch Types
| Feature | 1-2-Both | 1-2-Off |
|---|---|---|
| Positions | 1, 2, Both | 1, 2, Off |
| Power Options | Individual batteries or both combined | Individual batteries or completely off |
| Pros | Maximum power available when needed | Complete battery isolation for storage |
| Cons | Risk of over-draining batteries if “Both” is used carelessly | Less flexibility in power management |
Proper Battery Switch Usage
Safely switching between your travel trailer’s battery sources is crucial for preventing damage to your electrical system and ensuring a reliable power supply. Understanding the proper procedure and potential pitfalls is key to a smooth and enjoyable camping experience. This section will Artikel the steps involved, emphasizing safety and preventative measures.Properly using your battery switch involves a methodical approach to avoid damaging your appliances or batteries.
This includes understanding when to switch, how to switch, and what precautions to take. Neglecting these steps can lead to significant problems, so careful attention to detail is essential.
Switching Between Battery Sources
Switching between your battery sources—typically your house batteries and your tow vehicle’s charging system—requires a careful sequence of steps. First, ensure all appliances and electronics within the travel trailer are turned off. This prevents power surges and protects sensitive equipment. Then, locate your battery switch, usually clearly labeled and easily accessible. Next, carefully switch to the desired battery source.
If switching from the house batteries to the tow vehicle’s charging system, allow sufficient time for the batteries to charge fully. Finally, verify that the intended battery source is powering the trailer by turning on a few test appliances.
Importance of Turning Off Appliances Before Switching Batteries
Turning off all appliances before switching batteries is paramount to avoid electrical damage. When switching sources, there can be a momentary voltage fluctuation. This fluctuation, while usually brief, can damage sensitive electronics if they are left on. For example, leaving a refrigerator running during a switch could cause its compressor to fail. Similarly, leaving lights or other appliances on could lead to blown fuses or damage to circuit boards.
So, you’re prepping for your awesome travel trailer adventure? First things first: understanding your power! Check out this guide on the battery switch on travel trailer function to avoid any dead-battery surprises. Knowing how to manage your trailer’s power is crucial, and once you’ve got that sorted, think about securing travel insurance. A good policy, like Aon travel insurance , can give you peace of mind knowing you’re covered for unexpected issues on the road.
Happy travels!
It’s always best to err on the side of caution and power everything down before making any battery switch changes.
So, you’re prepping for your awesome travel trailer adventure? First things first: understand your battery system! Check out this guide on the battery switch on travel trailer function to avoid any dead-battery surprises. Knowing how to manage your power is key, and once that’s sorted, you can focus on the fun stuff like securing your trip with Aon travel insurance for peace of mind.
Getting insurance sorted early means you can relax and enjoy the journey knowing you’re covered.
Preventing Accidental Battery Discharge
Preventing accidental battery discharge is vital for ensuring your travel trailer is ready to use whenever you are. One common preventative measure is to regularly check your battery levels using a voltmeter. This allows you to identify low battery situations and address them before they become problematic. Another effective strategy is to ensure that all lights and appliances are properly switched off when not in use.
Leaving a single light on can drain your battery over time, especially if the trailer sits unused for extended periods. Finally, consider installing a battery disconnect switch to completely isolate your house batteries when the trailer isn’t in use. This prevents parasitic drain from small electronic devices and alarm systems.
Potential Problems from Improper Battery Switch Use
Improper use of your battery switch can lead to several problems. A common issue is blown fuses, caused by power surges during improper switching. This can leave you without power to essential appliances. Another potential problem is damaging sensitive electronics, as mentioned earlier. Additionally, repeatedly neglecting to turn off appliances before switching can lead to premature battery failure.
In the worst-case scenario, improper use could even cause a fire, due to overheating from excessive current draw.
Battery Switch Checklist
Before switching batteries, it’s essential to follow a checklist to ensure a safe and efficient process. This checklist should include confirming that all appliances are turned off, locating and identifying the battery switch, verifying the current battery source, and understanding the intended destination of the switch. After switching, the checklist should involve checking that the intended power source is functioning correctly by testing several appliances and confirming that the voltage levels are stable.
A regular maintenance schedule, including checking battery water levels (if applicable) and inspecting connections for corrosion, should also be included in your overall battery care plan.
Troubleshooting Battery Switch Issues
Dealing with a faulty battery switch in your travel trailer can be frustrating, leaving you without power when you need it most. This section will guide you through identifying, diagnosing, and resolving common problems. Understanding the basics of electrical systems in RVs is helpful but not strictly necessary to follow these troubleshooting steps.
Common Battery Switch Problems and Diagnostics
Several issues can cause your battery switch to malfunction. The most common are no power to the trailer, blown fuses, and a switch that simply won’t turn. Diagnosing these problems often involves a methodical approach, starting with the simplest checks and progressing to more involved tests. A visual inspection is always the first step, looking for obvious signs of damage or loose connections.
Troubleshooting Steps for Battery Switch Malfunctions
Let’s assume your travel trailer is completely without power. Your first step is to check the main battery switch itself. Is it in the “on” position? If not, simply turning it on might solve the problem. Next, visually inspect the fuses both near the battery and inside the trailer’s fuse panel.
Look for any blown fuses (a broken filament inside a glass cartridge). Replace any blown fuses with fuses of the same amperage rating. If the problem persists, move on to checking the battery connections. Ensure they are clean, tight, and corrosion-free. A corroded connection can prevent power from flowing.
If all of this checks out, then more advanced testing is needed.
Troubleshooting Flowchart for a Non-Functioning Battery Switch
Imagine a flowchart. The first box would read: “Is the battery switch in the ‘on’ position?” A ‘yes’ branch leads to “Check fuses.” A ‘no’ branch leads to “Turn the switch ‘on’.” From “Check fuses,” a ‘yes’ (blown fuse) branch leads to “Replace fuse and test.” A ‘no’ branch (no blown fuse) leads to “Check battery connections.” From “Check battery connections,” a ‘yes’ (loose or corroded) branch leads to “Clean/tighten connections and test.” A ‘no’ branch (connections are fine) leads to “Test battery switch with multimeter (see next section).” From “Replace fuse and test,” a ‘yes’ (problem solved) branch leads to “Done!” A ‘no’ branch leads to “Test battery switch with multimeter.” From “Clean/tighten connections and test,” a ‘yes’ (problem solved) branch leads to “Done!” A ‘no’ branch leads to “Test battery switch with multimeter.” Finally, “Test battery switch with multimeter” leads to either “Switch faulty – replace” or “Problem elsewhere in the system.”
Safe Multimeter Testing of the Battery Switch and Wiring
Before using a multimeter, ensure it’s set to the appropriate voltage setting (usually DC volts for a 12V system). Always disconnect the negative battery terminal before testing any electrical components – safety first! To test the switch itself, set your multimeter to measure DC voltage. Place the red lead on one side of the switch terminals and the black lead on the other.
With the switch “on,” you should read a voltage equal to your battery’s voltage (around 12V for a 12V system). If you read 0V, the switch is likely faulty. To test the wiring, place one lead of the multimeter on the positive battery terminal and the other on the wire leading from the switch to your trailer’s power system.
You should again read approximately 12V with the switch “on.” If the voltage is 0V, there’s a break in the wiring. Repeat this test for the negative wire. Remember to always reconnect the negative terminal after testing.
Battery Switch Maintenance and Replacement
Keeping your travel trailer’s battery switch in top condition is crucial for reliable power. Regular maintenance prevents costly repairs and ensures your appliances function correctly. Neglecting this simple task can lead to corrosion, poor connections, and ultimately, a dead battery when you need it most. This section details a maintenance schedule, cleaning procedures, and the process of replacing or upgrading your battery switch.
Regular Maintenance Schedule
A proactive approach to maintenance is key. Aim for a visual inspection of your battery switch at least once a month, especially before and after extended periods of storage. More frequent checks are recommended in harsh climates (extreme heat or cold, high humidity) or if you notice any unusual behavior from your battery system. A thorough cleaning and inspection should be performed every six months, or annually at a minimum.
Consider replacing the switch every 3-5 years, depending on usage and environmental conditions. A switch that shows significant corrosion or signs of damage should be replaced immediately.
Cleaning and Inspecting Battery Switch Contacts
Before beginning any work, always disconnect the negative battery cable to prevent accidental short circuits. Use a wire brush or a battery terminal cleaner to remove any corrosion or debris from the battery switch contacts. Pay close attention to both the positive and negative terminals, ensuring they are clean and free from any build-up. After cleaning, apply a thin layer of dielectric grease to the contacts to prevent future corrosion and improve conductivity.
Visually inspect the switch itself for any cracks, damage, or loose connections. Tighten any loose screws or bolts as needed. If you notice any significant damage, replacement is recommended.
Replacing a Faulty Battery Switch
Replacing a battery switch is a relatively straightforward process. However, always prioritize safety. Begin by disconnecting both the positive and negative battery cables. Next, carefully remove the switch from its mounting location, noting the wiring configuration before disconnecting any wires. Install the new switch, ensuring the wiring is connected correctly according to the original configuration.
Securely mount the new switch and reconnect the battery cables, positive first. After reconnection, test the switch to ensure it functions correctly. If any doubts exist, consult a qualified technician.
Upgrading to a Higher-Capacity Battery Switch
Upgrading to a higher-capacity battery switch might be necessary if you’ve added more power-hungry appliances to your travel trailer or if you’re experiencing issues with your current switch handling the load. The process is similar to replacing a faulty switch, but you’ll need to ensure the new switch is rated for the increased amperage. Always check the amperage rating of your existing wiring and battery system before upgrading to ensure compatibility.
An incorrectly sized switch can lead to overheating and potential fire hazards. It’s best to consult an electrician or RV specialist to ensure you choose the correct upgrade and complete the installation safely.
Necessary Tools and Materials for Battery Switch Replacement
Before starting any work, gather the necessary tools and materials:
- New battery switch (with appropriate amperage rating)
- Wire brush or battery terminal cleaner
- Dielectric grease
- Screwdrivers (Phillips and flathead)
- Wrench (size appropriate for switch mounting hardware)
- Voltage meter (optional, for testing)
- Safety glasses
- Work gloves
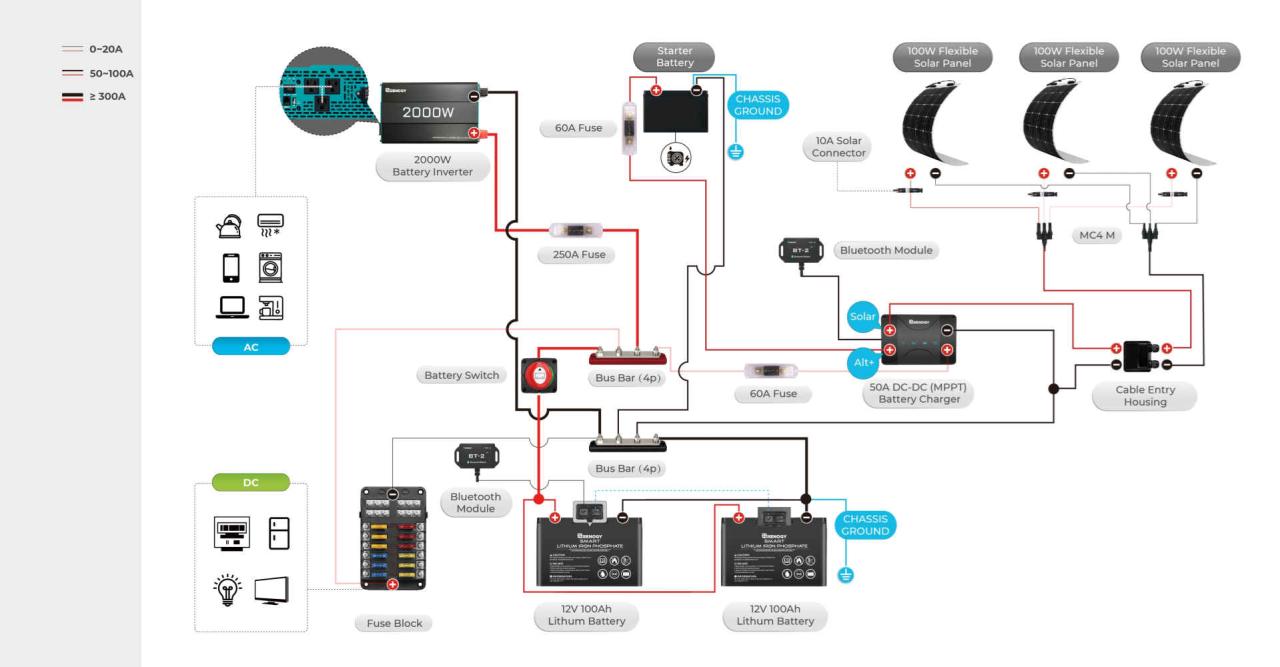
Battery Switch and Electrical System Integration: Battery Switch On Travel Trailer Function
The battery switch is the central control point for your travel trailer’s 12-volt DC power system, acting as a master on/off switch for your house batteries. Understanding its role within the broader electrical system is crucial for safe and efficient RV operation. It’s not just a simple switch; it’s a key component that dictates how power flows and protects your battery and other components.The battery switch interacts directly with several key electrical components.
When the switch is in the “on” position, it allows the house batteries to power various appliances and systems within the trailer, such as lights, water pumps, and refrigerators (if running on 12V). The converter, which transforms 120V AC power from a campsite hookup into 12V DC power for charging the batteries and powering some devices, is usually connected downstream from the battery switch.
This means the converter can charge the batteries only when the switch is “on.” Similarly, an inverter, which converts 12V DC power into 120V AC power for running AC appliances, draws power from the batteries via the switch. In short, the battery switch is the gatekeeper for most 12V DC power within the RV.
Battery Switch and Charging System Relationship
The battery switch’s relationship with the charging system is fundamental. The charging system, which typically includes a converter/charger and potentially solar panels, replenishes the battery’s power. With the battery switch “on,” the converter/charger can supply power to the batteries, charging them. If the switch is “off,” the batteries are disconnected from the charging system, preventing overcharging or accidental discharge through other components.
This is a critical safety feature. Solar panels, if present, will typically connect to the batteries via a charge controller, which itself might be located before or after the battery switch, depending on the system design.
Electrical Diagrams: With and Without Battery Switches
A travel trailer’s electrical system without a battery switch would be a simpler, albeit less safe, configuration. Power from the batteries would directly feed the various 12V DC appliances and systems. The diagram would show a direct connection between the batteries and the loads. A converter/charger would still charge the batteries, but there’s no master switch to isolate them.
Conversely, a system with a battery switch would show the switch as the central hub. All 12V DC loads would branch off from the switch, and the charging system would connect to the batteries on the other side of the switch. This arrangement provides a clear on/off point for the entire house battery system.
Battery Switch Location and Installation
The battery switch is typically located near the batteries themselves, often within a dedicated battery compartment, for easy access. This minimizes the length of the heavy-gauge wiring required to connect the switch to the batteries. The switch is wired in series with the positive (+) cable from the batteries to the rest of the 12V DC system. This means the positive cable from the battery goes to one terminal of the switch, then the other terminal of the switch goes to the positive bus bar or distribution point for the remainder of the 12V system.
The negative (-) cable is usually connected directly to the chassis of the trailer, acting as a ground. This arrangement allows the switch to control the flow of power to the entire 12V system. Installation involves secure mounting of the switch, careful wiring connections using appropriate gauge wire and connectors, and ensuring proper grounding.
Mastering your travel trailer’s battery switch isn’t just about convenience; it’s about safety and peace of mind. By understanding the different types of switches, following safe operating procedures, and knowing how to troubleshoot common issues, you can ensure a smooth and enjoyable RVing experience. Remember to regularly inspect your switch and perform basic maintenance to prevent problems down the road.
Happy travels!
Question & Answer Hub
What happens if I accidentally leave the battery switch in the wrong position?
Depending on the position, you might experience a drained battery or no power to your appliances. Always double-check the switch position before leaving your trailer.
How often should I clean my battery switch contacts?
At least once a year, or more frequently if you notice corrosion or poor connection.
Can I use a battery switch from a different RV model?
Potentially, but it’s best to use a switch with the correct amperage rating for your system. Consult an RV electrician if unsure.
My battery switch is making a clicking noise. What does that mean?
This could indicate a loose connection or a failing switch. Inspect the wiring and contacts. If the problem persists, replace the switch.
